Written By Steve Krantzman
2020-12-03
When working with DNN’s default HTML editor, “CKEditorProvider” by DNN Connect, the default settings out of the box leaves much to be desired. Even worse, If you have ever tried customizing CKEditorProvider‘s settings, you may have noticed that it is not always as straight forward as you would think, or like it to be. In a multi-part series I hope to clear up some of the mystery by showing you how to customize the CKEditorProvider to streamline your (or your clients) html module workflow, and to put the WYS back into WYSIWYG!
CKEditor vs CKEditorProvider Overview
CKEditor is the self proclaimed No. 1 Smart WYSIWYG Rich Text Editor for web pages and web apps. It was created in 2003 by Frederico Caldeira Knabben and was called FCKEditor. In 2012 it was completely redesigned and renamed to CKEditor 3, and in 2018 it was rewritten from scratch for CKEditor 5. A big benefit of CKEditor is that it has a rich feature set built-in by default, but it also allows you to add plugins (such as a content accessibility checker, or one to insert Font Awesome icons) to further expand its capabilities and functionality.
DNN on the other hand is no basic web page or app, and requires its HTML editor to be in the form of a provider to be used within the HTML module. Different DNN versions have incorporated different default HTML Editor Providers over the years.
| DNN Version |
HTML Editor Provider |
| 2.0.3 – 2.1.2 |
Ftb3HtmlEditorProvider (FreeTextBox) |
| 3.0.0 – 5.3.3 |
FckHtmlEditorProvider (FCKEditor) |
| 5.4.0 – 6.1.5 |
TelerikEditorProvider (Telerik RadEditor) |
| 6.2.0 – 7.4.2 |
RadEditorProvider (Telerik RadEditor) |
| 8.0.0 – 9.8.0* |
DNNConnect.CKEditorProvider (CKEditor) |
In 2015 DNN Connect took CKEditor 4, and packaged it up as a DNN HTML provider to create CKEditorProvider, which can be found here https://github.com/DNN-Connect/CKEditorProvider. In DNN v8.0.0, CKEditorProvider became the default HTML editor provider, replacing the long used Telerik RadEditor. The latest version of the DNNConnect.CKEditorProvider uses CKEditor v4.5.3.
For the default HTML editor provider that ships with DNN 8 and 9, there is a surprising lack of documentation considering the HTML module is arguably one of the most heavily used modules in most CMSs, and DNN is no acceptation. Logically you would think that you could turn to the CKEditor Ecosystem Documentation, as CKEditor 4 is the core of DNN Connect’s CKEditorProvider. However, where CKEditor relies heavily on config files to customize the editor, CKEditorProvider stores its setting in the CKE_Settings table in the DNN database. This makes following the CKEditor documentation to configure some CKEditorProvider customizations problematic.
In this series on working with CKEditorProvider, we will cover some of those customization challenges. Before we do, lets start with some basics settings, that many DNN admins are simply unaware of, that can make working with the HTML editor more enjoyable.
The WYSIWYG Problem
You have a DNN theme that utilizes Bootstrap 4 and Google’s Open Sans web font (a sans serif font) as the default font, along with a whole host of custom styles. Yet whenever you are working in CKEditor your Bootstrap columns are not reflected in the editor window, and the default font shows up as Times New Roman. The last time I checked, Times New Roman is a serif, not a sans serif font. What’s up with that?
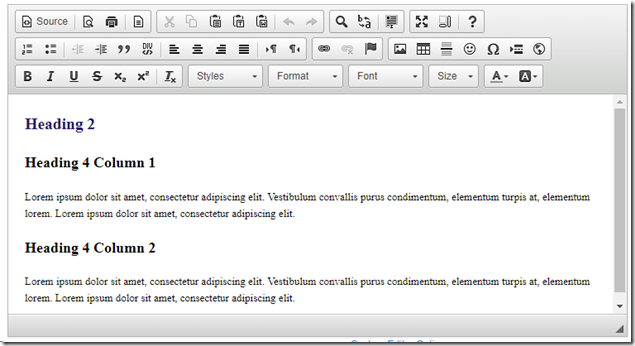
Because you are not seeing the site’s styling in the editor window, you find that you have to create and save your content, view what the actual final results look like on the page, then go back into the editor to make additional changes… rinse and repeat. So much for WYSIWYG.
Putting the WYS Back Into WYSIWYG
To have the editor display your site’s styling correctly in the editor window, follow the steps outlined below:
- Use DNN’s “Site Assets” feature to
upload a copy of your site theme’s CSS file to the portal’s root directory, or a subdirectory under the root directory (if one does not already exist in one of these locations.) As an alternative you can create a separate CSS file with whatever key styles you might use on your site.
EDIT (12/08/20) On hindsight I would not recommend creating a copy of your site theme’s CSS file, as then you have to maintain duplicate files. However, it was the only thing I could get to work at the time of writing. My recommendation is to create a new file called ckstyles.css (or any name you want) in your portal root folder. Then on the first line of the file, import your site theme’s CSS file.
@import url("http://your_site.com/portals/_default/skins/your_theme/css/style.min.css");
If you are not sure what the url for your site theme’s css file is, use “Global Assest” to browse for your site theme css file, select it, and use the “Get Url” button to retrieve it.
- Next, from the DNN Persona Bar, go to Site Settings > Site Behavior > More and click on the Open HTML Editor Manager button to open it (or click on the “Custom Editor Options” link under the editor window when editing html content.)

- On the Main Settings tab, expand the Configuration section and locate the “Editor Area CSS” property.
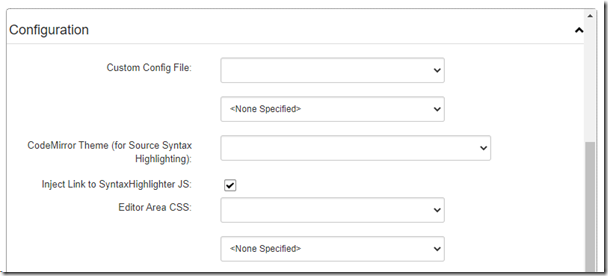
- Use the top dropdown to choose the subdirectory your CSS file is located in, or leave it blank if your CSS file located in your portal root directory. Then use the lower dropdown to select your newly uploaded or created CSS file.

- Save your changes and close out of the HTML Editor Manager.
When you go back into the html module to make edits, you should now see the content in the editor window styled correctly, including Bootstrap columns, headings, and web fonts.
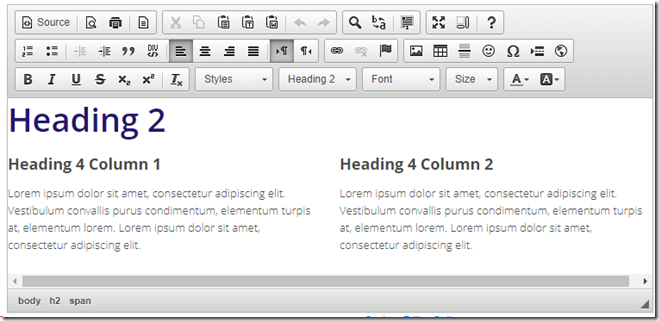
Note: This feature in CKEditorProvider appears to be very temperamental. Once you create the CSS file in step one, it appears you cannot rename it or replace it with another file without breaking the feature. Also I have noticed that not all styles appear in the editor window.
Less Than Useful Options in Styling Dropdown Lists
Most of the out of box options in the styling dropdowns are not at all useful. Lets look at two of these that should be updated immediately. First lets take a look at the Font Color and Background Color options:
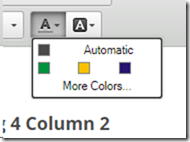
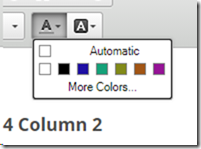
Out of the box it looks like we have a whopping three colors to choose from Green, Yellow, and Blue, as well as Automatic. I don’t know about you, but I don’t see any of these colors being useful on a production site. What would be useful is to have my site’s default color scheme, so I don’t have to keep going to “More Colors…” and keep defining them (even if I could remember their hexadecimal values off the top of my head which I can’t.)
The Text and Background Color Fix
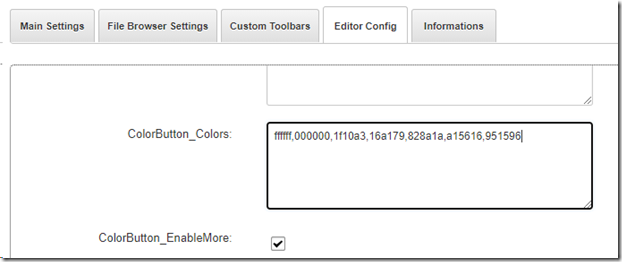
- Make a comma separated list of your site's color scheme hexadecimal values (without the hashtag), and any other colors you would like quick access to, like I have here:
ffffff,000000,1f10a3,16a179,828a1a,a15616,951596
- Open the HTML Editor Manager and select the “Editor Config” tab.
- Locate the “ColorButton_Colors” property, and paste in your comma separated list. This property affects both the Text Color and Background Color buttons.
- Save your changes and close out of the the HTML Editor Manager, then edit the content of an HTML module.
You should now have a more useful list of colors at your disposal. I am not sure if there is a maximum number of colors that you can have in the list, but I have successfully added 40 colors which displayed as 5 rows with 8 colors per row.
Are You Kidding Me With Those Font Size Options
As your read this, you might finally realize that many of the out of box settings are really not meant to be used, but are simply there to show you some examples of what can be used when customizing the editor. The font size option list is a prime example… Take a look at these less than useful font size options:
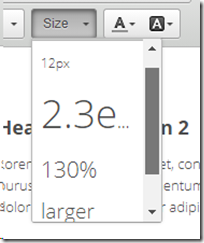
I am not sure about you, but I would prefer px, rem, or both as my font sizes (I prefer rem over em, as rem is relative to the default/root font size, while em is relative to the direct/nearest parent container's font size.) Your choice will ultimately be determined by the HTML knowledge of your page editors, or your preference.
The Font Size Fix
-
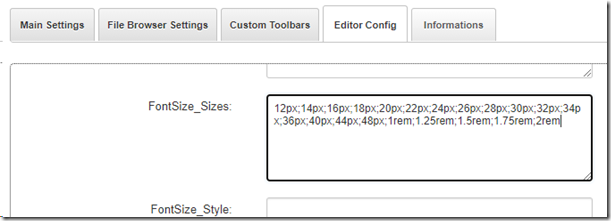
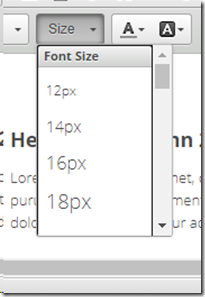
Make a semicolon (yes semicolon not comma) separated list of the font sizes you would like to have access to in the Size dropdown list. As seen above you can use px, em, %, and named units, but you can also use other units such as rem. When you create your list, the list can be of all one unit type or of mixed units. Your list should follow your site’s theme sizing guidelines. Here is an example list:
12px;14px;16px;18px;20px;22px;24px;26px;28px;30px;32px;34px;36px;40px;
44px;48px;1rem;1.25rem;1.5rem;1.75rem;2rem
-
Open the HTML Editor Manager and select the “Editor Config” tab.
-
Locate the “FontSize_Sizes” property, and paste in your semicolon separated list.
-
Save your changes and close out of the the HTML Editor Manager.
When you go back in to edit the content of an HTML module, your Size dropdown list should now be populated with the font sizes you use on your site.
Wrap Up
While the default DNN HTML provider CKEditorProvider provides a feature rich and stable rich text editor right out of the box, configuring some of the basic styles is one of the first things you should consider after installing your site theme. By doing so, it will make it easier for the site’s editors to work with and style HTML content that closely matches the site’s design standards.
You should know that DNNConnect.CKEditorProvider is not the end all, be all, in the world of .NET rich text editors, as it is using CKEditor version 4.5.3 which was released in August of 2015. Even DNN suggest using a different HTML editor: “DNNConnect.CKE - you'll probably want to update this one to something better, like the latest CKEditor” [1].
I hope you found these first few CKEditorProvider customization useful. If you did check back later for some more customizations tips. As for the next blog in this series, we will take a look at updating the “Styles” dropdown list, and explore a good reason why you may want to do that. In future blogs we might look at adding some plugins to the CKEditor and we may even tackle installing and using an updated version of CKEditor 5.
Thanks for reading!
*DNN 9.8.0 was the latest version of DNN at the time of this writing.
References
1. “HTML Editor Providers.” DNN Corp, DNN Corp Wiki Page, 7 Apr. 2015, www.dnnsoftware.com/wiki/html-editor-providers.